
I too, along with every other producer/studio engineer in the world, long for my very own studio console with all of my gear tightly tucked inside as if it was made especially for me like the one above. But, reality once again takes over. I did some research online and found out that these custom-made consoles do in fact exist and are available just for my recording mixer/control that I use. Now, the part that I didn’t like was the price tag. For example, here is the Argosy Console that is made specifically for my Tascam FW-1884 console.
http://www.argosyconsole.com/argosy_tascamfw1884.html
If you are so inclined to follow the link to the end of the purchase page you will notice that this console, though perfect for my situation costs roughly $1800.00 (US). That is just not doable for my new studio. So, I decided to build one like it myself.
And away we go!
The Beginning)
Always make sure that you have an idea of what you want to build prior to building it. I spent about 2 weeks drawing pictures of all my ideas so i could eventually pick the best one to build.
Here is a few pictures of my first drawings of the console with approx. measurements, etc.


These are just crude drawings of what the final one will look like, but in the end I have the idea of what I am going to build. And that is what’s important.
Day 1)
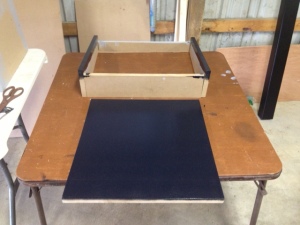
Now comes the “real” part of the build. I had to decide what material to make the console out of and what size to make the desktop. I decided on 3/4″ MDF because it is easy to work with and doesn’t cost a ton of money. (Approx. $30 a 4′ x 8′ sheet from Home Depot) I then double measured and double checked my measurements using my Tascam Mixer and a plastic folding table. I went to the store and picked up one sheet of MDF and had them cut it to size for my flat surface of my desk.
Here is what the finished piece looked like with my mixer on top. I used a 2×4 for spacing for my arm rest that I will make later.


Once I was sure that my measurements were correct again (measure twice, cut once) I proceeded to start building the pieces that would surround the mixer and provide the angle for the first section of the desk.
I cut 4 identical pieces so that the angle of the desk would be straight.


From this point, the shape and contour of the desk starts to come to life. I could almost picture in my head exactly what it was going to look like.
Next, I measured the 4 pieces that would make up the top (rack) portion of the console. Again, these are identical pieces. The angle is based on the 4U rack Space rails that I have.


I placed the 4 pieces of the rack on the desk and placed the top piece on to see what it would look like and to make sure I have everything measured right. I used the level just to make sure that it was at least mostly level : ) Remember, I am not going for complete perfection here.


At this point in the build I wanted to see what it would look like with my rack gear in it so i sat one of my compressors on a few 2×4’s to see what it would look like. Not bad!


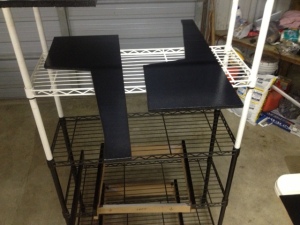
It was time to start filling in the spaces on either side of the mixer and in the middle above the mixer. I made this whole thing easily changeable just in case I were to ever get another mixer, that way I wouldn’t have to re-build the entire desk. (the pieces on top f the desk are just adding weight since the desk isn’t screwed together yet)


After once again making sure that everything fit together correctly, I started by screwing the sections on either side of the mixer together. Once that was complete, I measured the top to make sure that I would trim the exact right amount off. The second picture below is after the top was trimmed and screwed in to place. (I want to mention to at this point that I have not attached any of these pieces to the bottom piece of wood. This will probably only be done during the final assembly process)


Day 2)
I started the day by figuring out how I wanted to mount the 4U Rack rails. I had thought about making them straight up and down as well as angled with the desk. After mocking them up I decided on the angle for looks. Here is the 4U rack with some gear in it.


After installing the other side racks, it was time to start sanding this thing to make is smooth. I really have no idea what sand paper to use so I bought a multi-pack that has a few different types. I started by sanding all the square edges to make them slightly rounded and smooth to the touch. Then I worked on all the big surfaces and edges.


You can see the difference already that the sanding has made. It just gives everything a finished look. Plus, it covers some of the slight cutting mistakes I had made. Hey, No one is perfect. That is why there is sanding and painting!
Here is what it looks like after sanding. Notice how smooth the finish looks now.


Here is what it looks like with the console mixer in place.


Day 3)
I decided to cut the table top to match the size of the top and mixer sections. I was going to leave it longer and use it for storage, etc. but after looking at it all together, the decision was easily made to trim it up.


Day 4)
It is time to make the armrest. My first idea was to use a 2 x 4 for the base of it (it would be the right height and make the front of the desk that much more sturdy and then use thick foam on top of that to make it more like an actual armrest. Then I would wrap the entire thing in vinyl to finish the look.


I bought the foam at the fabric store cheap and cut it in to pieces (it is hard to cut straight) and laid them out on the 2 x 4.


After wrapping it with the vinyl (sorry no pic) i decided that the foam just wasn’t looking right under the armrest. So, I just joined together (2) 2 x 4’s and ironically got the exact height I was looking for and all of the sturdiness that I was wanting. And once wrapped, looks even better than the foam version.


Before I finished the armrest, there is one other thing that had been making me not happy with the design. It was the fact that you could see the screws on the side. So I decided to make some trim pieces that would cover the sides and the edges of the armrest. I mocked up the wrapped armrest to get the right angle, length etc.


Here is a “Before” and “After” of the console with the trim piece. Huge difference!


Once I was sure the trim pieces were correct, it was time to finish the armrest. I started by screwing the 2 boards together and wrapping it tightly in the black vinyl. I used way more staples than I should have, but trust me… it isn’t going to come off!


Here is the armrest sitting on the console with the finished trim pieces. I really don’t like that the foam didn’t work out as the armrest because with just the wood it is not very soft, but… it does have the exact look I was going for… So what the hell, right?


Here is the console with everything put together. I added the Rack Units on one side so that you could see how it was going to look in the end.


Day 5)
A good console is nothing without a base. So today, it is time to build it! I made my measurements based on the top. I didn’t want it to be exactly the same size (I wanted a little bit of the top to hang over) so I made it 1″ shorter on the back and sides. I also made another section for the G5 tower. I made this one a little shorter than the others because I ran out of wood and didn’t want to buy another sheet just to use one piece. I had a 12″ shelf lying around so I used it for the mockup to get the spacing right.


Before screwing everything together I wanted to get an idea of what it would all look like so I set the top rack and mixer/armrest portion on the desk to get the full view and make sure it was what I wanted.


Once I had everything together I decided that it looked great and it was time to start putting it all together for real. I took everything off the top and used a 2 x 4 to brace the pieces together. One thing I made sure of is that the 2 x 4 didn’t go towards the front enough to hit your legs on it when you sat at the desk. I also have plans of adding a keyboard shelf later on, so leave room for that as well. I also added 2 x 4’s under the shelf so that the shelf is off the floor by a few inches.
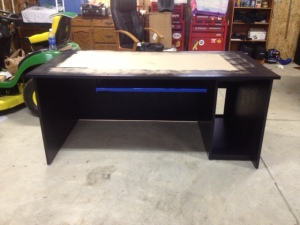
When I was done for the day, I put everything together to see what the “almost” finished console will look like. I Love It.


Day 6)
The Console is finished! it is time to start priming it for paint! I tried a few different methods for finishing and came up with a good one that works well. Rustoleum Painter’s Touch Primer with Rustoleum Painter’s Touch Ultra Cover “Semi-Gloss” Black Latex Paint. Its not perfect, but provides a nice finish.
The important part when disassembling the desk is to label everything and I also put all of the screws, etc. that i took off the desk in a bag so everything is ready to go once I get the desk done and I am ready to assemble.

First, I started with the Rack area. I did this because it had a lot of areas to paint and I wanted to do at least 3 coats. So why not start with the largest piece first?


Then after making sure that all the nooks and crannies were primed, I moved on to the smaller pieces.


You will notice in the pictures that I didn’t primer the entire surface area of every piece. The reason for this (besides laziness) is that most of the pieces with be hidden within the console once it is assembled. So why paint the pieces no one is ever gonna see, Right?
While the primer was drying on the desktop pieces, I decided to head back to the base of the console to do a little more work on it. One thing I wanted to do was to cut out a section in the back of the shelf area where the tower will go. One, so that I can pass the cables through it and another because those G5 Towers get really really hot if they are restricted of air, so the more air flow to the tower the better.


Day 7)
After letting the primer dry overnight it was time to apply the first coat of black paint. I made sure to make even strokes with the roller and I didn’t try to make it perfect the first round, I will probably end up doing 2 or 3 coats, so no hurry


Day 8)
It was time to finish the 2nd and 3rd coat of paint. It was also time to start painting the base of the desk. Up to this point, everything I have done has been on the top. I didn’t spend as much time on the underside of the desk as it will mostly be hidden from view, I just wanted it to be completely covered with the paint.


I made sure to make nice even coats on all the pieces that will be visible on the desk. Below are the trim pieces and the shelf for the tower.

Day 9)
Today is the day that I put the console back together to make sure that all the painted pieces look good and there aren’t any obvious spots that I missed. Below you can see the full mockup of the desk. The table top of the desk has yet to be painted at this point because I want to see how much of it I need to actually paint since 90% is covered.


Once I had everything fit and made sure that it was the way I wanted it, it was time to start painting the last but most crucial piece of the desk. The top. I fit the top to the base and started by painting the underside and edges first and let them dry. Then, I applied at least 2 coats to the top edges painting about a 4″ line all the way around to cover any parts that may show in the final assembly. You can also now see the keyboard shelf.


Day 10)
Well, Its Move In Day at the studio. I started with the base and did the final assembly from there. I will be posting more and more as it progresses as it will probably take me about 6 months to actually get everything up and going in the studio.
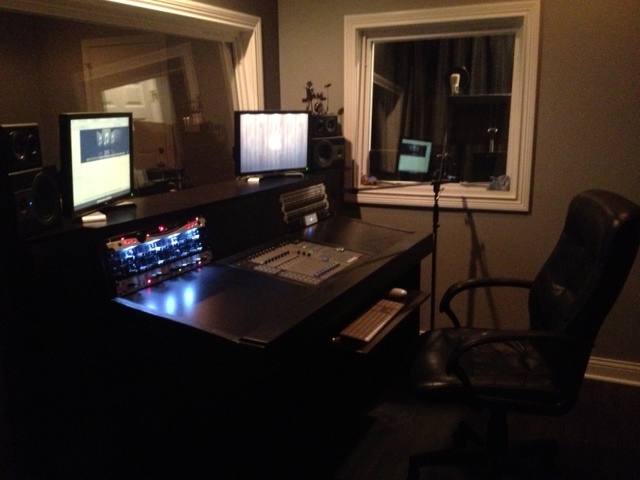
Here are the final pics of my post for you. In the first 2 you can see the console going together nicely in its new home.


In the final 2 pictures you can see the completed console without then with all the studio goodies.


Please feel free to leave comments as I would love to hear from you guys on what you think!
Thanks for sharing this short journey with me and please check back often for updates!

This is really inspiring, looking to build a console desk myself. Thanks for sharing 🙂 this has given me a good starting point.
Thanks for the kind words. I am always inspired reading other people’s work so I created this blog to hopefully inspire someone else… Mission accomplished!
Very nice! That vinyl arm rest is the actual truth!! didnt think it would of been that easy. I’ll be saving this tutorial, thanks!
Sheldon, thank you for the comment. It’s amazing how easily you can make something that it both functional and amazingly cheap!
Cheers.
Amazing desk man! 🙂
Just wondering, what did you use to cut the mdf board? Jigsaw?
James, I used a table saw mostly. The MDF is very forgiving when it comes to sanding, etc. I always cut outside the lines, then just sanded to the correct size.
Hope that helps and thanks for the comments!
PERFECT!!!!! Only question I have is….. How many “MDF” sheets did you use?
Stan,
Thanks for taking the time to reply. I am pretty sure I bought 3 sheets. I went to my local Home Depot on an afternoon when I knew they wouldn’t be very busy and had them cut most of the base and large upper pieces that I needed.
I am pretty good with a saw, but nothing beats a perfectly cut piece of wood when building a piece of furniture.
The nice thing is I also have a bunch leftover, so if I ever need anything, at least I have a good start 😉
Could we get a post on a more detail level for the measurement for the top piece? Awesome job
Is there a way u could post or email more measurements
man thank you for sharing that great info!very inspiring..
This was REALLY helpful! Thank you so much for taking the time to do this!
I have a question about measurements. The 1884 specs list it as 22.9″ wide (23 as you show in your drawings), but illustrations in the manual show the 22.9 to include the plastic sides which can be removed for placement into a rack or desk like yours. I have a desk I built around a DM-24, and it’s 23 1/8 which will accommodate the FW-1884, but I’d like to find out for sure what the width is without the plastic trim. Thanks in advance for any info.
The set up looks good I did it thing! I studied the fact that u used mdf board and it works!!! It really calls sexy! Better yet it works for what and how it doing it and that’s what counts, good luck with this masterpiece
Fantastic Job!
This is amazing! Thanks for taking the time to post this.
Daaamn, I wish I had half of your skills…
I’m definitely gonna build something like this for my studio!! 😀 Simply awesome
Very nicely done. I am building my studio now, and some of these ideas will come in very handy.
Charles, best of luck to you!
foam for rest is easier to cut straight with an electric knife.
Brilliant read! I’ll definitely be referencing from this post! Console looks amazing as well! How do find working with your computer monitors so wide apart? If you don’t mind me asking… mine are butted up with my arrangement and mixer on either screen… just out of interest 🙂
Such a great article and best ideas
Super Travaille… Très bien réussit et très jolie. serait il possible d’avoir les plans avec les cotes pour que je puisse refaire le même chez moi ?
Cordialement,
Bonjour, très beau meuble félicitation.
Serait-il possible d’avoir toutes les cotes ?
D’avance je vous en remercie et encore BRAVOOOOOOO